The drive to prepare a meal can come in waves. You braise short ribs for hours on Sunday and struggle to gather the will to make ramen on Thursday. On those nights, it helps to have a freezer full of, well, braised short ribs. It's cheaper than takeout, requires nearly no energy to reheat and feels like an act of care — past you taking care of present you.
The freezer is the best source of fully cooked dishes, homemade meals that need only to be heated through and, of course, desserts for sweet cravings. (It also remains a smart place to store many ingredients.)
And it's as simple to stack up dishes in your freezer as it is to understand what keeps best and when to eat it.
What can I freeze?
You can freeze anything, although some foods are better suited and all start to diminish in taste, texture and scent over time. So it's not exactly a matter of can, but should.
How water turns into ice largely determines what freezes best. As fresh ingredients with a lot of water freeze, their cell walls break, altering their texture. Cooking does something similar, which is why, with their broken cell walls, fully and partly prepared dishes maintain their integrity in the freezer.

How long should I freeze something?
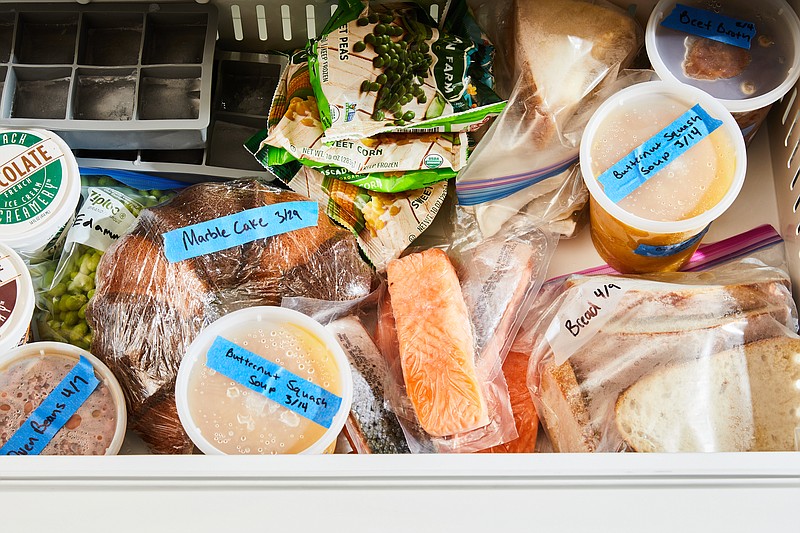
The short answer is a year, maximum — not because the food will spoil, but because it'll taste sad. (The Centers for Disease Control and Prevention has a cold food storage chart, for more precise timelines.) Two to six months is better for ensuring quality. So is wrapping the food tightly. Exposure to freezing air causes food to dehydrate, making it tougher and more bland (commonly known as freezer burn). The oxygen in that air can also cause food to oxidize, causing fats to taste rancid. Follow these tips for ideal food storage, and be sure to label and date every item using masking or painter's tape and a permanent marker, so you're never left wondering what you have.
How long is something safe to eat?
As long as your freezer is at or below zero degrees, bacteria can't grow. The best way to tell if something seems fine to eat is to smell and touch it after it defrosts. If it smells rotten or rancid, and doesn't feel the way it should — think mushy, mealy fish — trash it. If you're not sure, take a little nibble. If it tastes good, enjoy.
But remember: The freezer is not a time machine. If leftover stew close to turning in the refrigerator is thrown in the freezer, it won't thaw into impeccably fresh stew. Once thawed, it'll return to its iffy state.
What are the best prepared dishes to freeze?
› Soups, stews and braises: Anything liquid, soft or stored in sauce stays intact in the freezer. Stocks, soups (creamy, chunky or brothy) and stews of all kinds (from curries to chilies) can be ladled into sturdy airtight containers with at least an inch of room at the top. Braised meat or vegetables like collards should be smothered evenly in their sauce. Meatballs hold up especially well if stored in gravy, and from-scratch beans keep their creamy, tender texture when packed with their starchy simmering liquid.
Ideally, thawing would occur overnight in the refrigerator, but these dishes can be quickly defrosted straight from the freezer. Run the sealed container under hot water until the ice block releases, then slide it into a saucepan. Add a scant inch of water, set over medium-high heat, cover and simmer, occasionally breaking up the ice, until everything bubbles evenly for a few minutes.
› Casseroles and sweet or savory pies: Lasagna and anything like it — meat, vegetables or starch layered with sauce — are freezer heroes. Fully cooked casseroles can be wrapped tightly in their dishes, then unwrapped, covered with foil and heated in the oven. Leftovers can be portioned and sealed into smaller containers, then popped out and zapped in the microwave or baked until bubbling. A casserole with cooked components, such as tomato-meat sauce or creamed broccoli and rice, can be assembled in the dish, wrapped and frozen, then cooked through in the oven.
Double-crust pies should be assembled with raw dough and chilled filling. The whole thing should be frozen uncovered until rock hard, then wrapped tightly until it's baked from its frozen state. Quiche should be fully baked, then frozen whole or in wedges. Thaw in the refrigerator, then heat in the oven.
› All manner of dumplings: Any two-bite treat wrapped in dough — pot stickers, samosas, mandu, pierogies, lumpia, phyllo rolls and the like — falls into a special freezer-friendly category. All can be fully assembled with cooked or raw fillings, then frozen uncovered on a tray until hard before being transferred to airtight containers. Then, boil, pan-fry, steam, deep-fry or bake them straight from their frozen state.
› Dessert: Homemade sweets should complement your ice cream stash. Meringue, gelatin, cream desserts (like trifles) and delicate baked goods (like sponge cake or tuiles) don't hold up well, but nearly every other sweet does. Cookies can be frozen as dough or fully baked. Dough balls and slices should be baked from frozen; ready-to-eat cookies taste fresh when heated in a toaster oven. Cakes and breads can be kept whole or wrapped in slices, and those with a very fine-textured crumb keep especially well.
Cupcakes, brownies and other bars, waffles, unfilled cream puffs (and their savory gougères cousins) keep well in airtight containers and thaw quickly at room temperature. For goods meant to be eaten hot, a quick blast in the toaster oven refreshes their crispness.
Stocking a freezer may seem like a task for vigilant planners, but it's especially helpful for those who don't plot out a weekly meal plan. Anytime you've made too much of a dish that freezes well, wrap leftovers well and throw them in. And anytime you're just too exhausted to cook, heat them up and be delighted with the meal you so lovingly made.
Oven Beans
The best way to cook dried beans? In the oven. The even heat keeps the water at a steady bare simmer, which results in beans that are tender all the way through — no hard spots or broken mushy bits — with almost no effort. Because the heat is dry, it also concentrates the inherent flavor of the beans and anything else thrown into the pot. You can simply simmer soaked beans in salted water or you can add aromatic ingredients, such as the garlic and dried chilies. Onion is also nice, and bacon and other cured pork products bring richness.
Total time: 2 hours, 50 minutes
1 pound dried beans, such as black, white, red, pink or pinto, picked over for stones
Salt
4 large garlic cloves, trimmed and peeled (optional)
5 dried chilies, such as morita, pasilla or guajillo, rinsed (optional)
Cover the beans with cold water by 2 inches in an ovenproof pot. Soak in the refrigerator for 6 to 8 hours. Or, to quick-soak, bring to a boil, turn off the heat and soak for 1 hour.
Heat the oven to 325 degrees.
Drain the beans, rinse and return to the pot. Add enough cold water to cover by 2 inches. Bring to a boil, then stir in 2 teaspoons salt and, if using, the garlic and chilies. Cover and transfer to the oven.
Bake until the beans are tender all the way through, 45 to 70 minutes. (Red kidney and white cannellini beans should simmer and cook for at least 30 minutes until tender to be safe to eat.) The timing depends on the size of the beans and how long they soaked. If you used the chilies, pick them out and discard them. If you used the garlic, smush them into the soaking broth to flavor it. Taste the beans, and season with more salt if needed. Use immediately, or transfer to airtight containers and refrigerate for up to 5 days or freeze for up to 6 months.
— By Genevieve Ko
Marble Cake
Buttery and not too sweet, this pound cake has a fine, tender crumb that's lovely with tea, coffee and on its own. Because chocolate tends to be the flavor that dominates marble cake, this version includes potent almond extract in the vanilla swirl and delicate orange blossom water in the cocoa batter, so the two tastes balance and complement each other. The cake develops even deeper flavors over time and keeps well at room temperature in an airtight container. It holds up in the freezer as well, wrapped tightly, for up to three months.
Total time: 3 hours
Yield: 1 (10-inch) cake
2 cups all-purpose flour
2 teaspoons baking powder
3/4 teaspoon fine sea salt
1/3 cup Dutch-processed (dark) cocoa powder
1/3 cup hot water
1 1/2 cups plus 3 tablespoons sugar
1 cup unsalted butter, at room temperature
4 large eggs, at room temperature
1 tablespoon vanilla extract
1 teaspoon almond extract
1 teaspoon orange blossom water or 3/4 teaspoon orange extract
Baking spray with flour, for the pan (see tip)
Heat the oven to 325 degrees.
Whisk the flour, baking powder and salt in a small bowl. Whisk the cocoa powder, hot water and 3 tablespoons sugar in a medium bowl until smooth.
Using a stand mixer or hand mixer on medium-high speed, beat the butter and remaining 1 1/2 cups sugar in a large bowl until pale yellow and fluffy. Scrape the bowl, reduce mixer speed to medium and beat in the eggs one at a time until incorporated. Beat in the vanilla. (You also can beat by hand in the same order using a wooden spoon.)
Scrape the bowl, turn the speed to low and gradually add the flour mixture. Mix just until incorporated. Scrape the bowl, and beat on high for 15 seconds to make sure everything is evenly incorporated. Scoop 1½ cups batter into the cocoa mixture. Mix the almond extract into the white cake batter and the orange blossom water into the chocolate batter.
Coat a 9- or 10-inch Bundt pan with baking spray. Scoop the 2 different batters in alternating mounds in the pan using 2 ice cream scoops or 2 large spoons. Run a chopstick or butter knife in a circle through the center of the batters, taking care to not touch the bottom or sides of the pan. For a more swirled cake, go around one more time, but no more. You don't want the lines between the batters to blur.
Bake until a toothpick comes out clean and the top springs back a little when gently pressed, 50 to 55 minutes.
Cool in the pan on a rack for 10 minutes, then invert the cake onto the pan to cool completely. To keep the crusty top crisp, carefully flip the cake again. Well wrapped, the cake keeps for up to 3 days at room temperature and up to 3 months in the freezer.
Tip: To ensure the cake comes out easily, use nonstick baking spray with flour. You also can use nonstick cooking spray or very generously butter and flour the pan, but the cake may stick.
— By Genevieve Ko