For someone who didn't grow up celebrating Thanksgiving, I've got a lot of strong opinions about turkey.
It's probably because I've cooked more of it than practically anyone I know, in just about more ways than I can list. I've roasted, braised, grilled, spit-roasted and deep-fried it. I've boned it out and made "turchetta." I've dry-brined it, wet-brined it, injected it with brine and stuffed slabs of herbed butter under its skin. I've built a makeshift cinder-block oven to cook it at a friend's farm that lacked a kitchen. I've even cooked 20 turkeys in a night, working the holiday in a restaurant.
And I once took an impromptu call from famed rancher Bill Niman. He was just starting to raise heritage turkeys and wondered if he could swing by with seven different breeds for me to cook for a blind tasting. I figured why not and threw myself into the challenge, roasting all of the breasts and right legs, and braising all of the left legs. I remember that I took lots of notes and that some birds tasted much more turkey-ish than others.
As I look back on all of this poultry, though, one thing is clear: No matter how complicated or technical the preparation, no one turkey I've ever cooked has been that much more exciting to eat than any other. (Though if it was under-seasoned or overcooked, it was certainly less exciting to eat.)
The truth is, deep down in my heart, I've always secretly hoped that if I cook it just right, a roast turkey will emerge from the oven as tender and juicy as a perfect roast chicken. And I suspect I'm not the only one who feels that way. But the fact of the matter is that it's a different bird! And it has completely different qualities.
So let's stop wishing our turkeys could be chickens, and let's stop making ourselves unnecessarily miserable by complicating the cooking process. When it comes to turkey, simpler is better.
While I've finally, grudgingly, admitted that turkey isn't chicken, it has occurred to me that I might be able to adapt my favorite roast chicken recipe for Thanksgiving. Three years ago, I published a recipe for three-ingredient, buttermilk-brined roast chicken in my book, "Salt, Fat, Acid, Heat." It's now among the most beloved of my recipes, and every November, people reach out to ask if they can apply the technique to their holiday turkey.
I've always answered hesitantly - not having tested it, I wasn't sure that the skin wouldn't grow too dark with the longer cooking time or that the seasoning would be balanced. This year, I figured it was time to try it out for myself.
I set about tinkering, and the first thing I changed was timing. The chicken takes a simple overnight dip in the buttermilk, but a turkey weighs three times as much as a chicken, so it needs to spend a full 48 hours in the brine to ensure the meat is tender and properly seasoned throughout.
Next, the salt. Unlike the original chicken recipe, which leaves things to chance, I decided to specify the turkey brine's ideal salinity - no one wants a bland holiday bird. But I'm a pragmatist, and I know that we're not all using the same type of salt. I also know that different salts have different levels of salinity by volume, but not by weight. So, if you've got one, I encourage you to use a scale to measure out your salt to ensure a balanced brine. It's just about the trickiest part of the recipe, and I promise you won't regret it.
The last and most obvious change was my decision to spatchcock the turkey. By removing its backbone and flattening it out, I cut the cooking time by more than half. While in the chicken recipe, the lactose in the buttermilk contributes to perfectly golden-brown skin, I'd worried that a turkey's significantly longer cooking time might yield a blackened bird.
Spatchcocking put an end to that fear. Furthermore, laying the bird out flat means there's greater surface area for browning - more of that dark, lacquered skin for everyone.
An unexpected boon of spatchcocking is how beautifully it streamlines the entire brining process: Without a backbone, the turkey can just be folded in half and slipped into a 2-gallon zipper-top plastic bag containing the buttermilk and salt. There's no unwieldy pot or bowl taking up all of your refrigerator space. Just slip the bag in wherever it fits, turn it two or three times a day, and that's it. Simplicity is everything here.
This year will require something different of many of us, whether that means gathering in smaller groups, eating alone on a Zoom call or forgoing some of our usual Thanksgiving comforts. So I'm offering two versions of this recipe, for whatever your holiday entails: the spatchcocked whole turkey and a brined breast, for those who want turkey for four to six people.
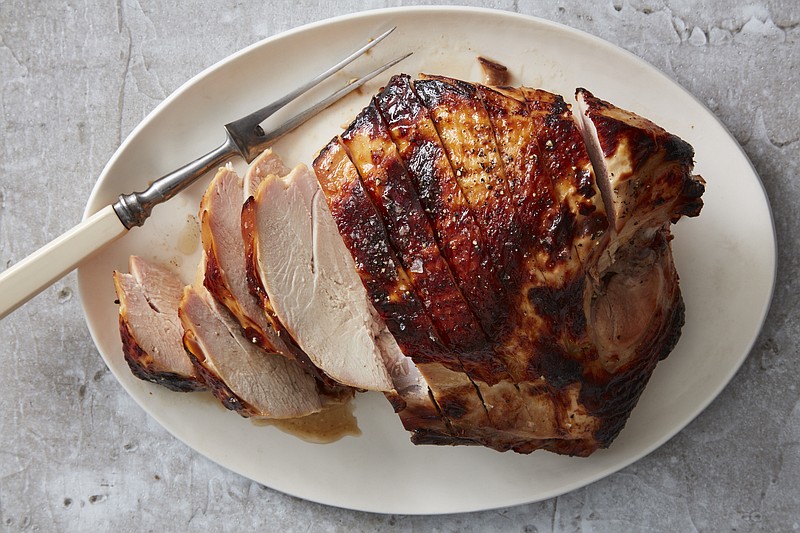
Both variations yield incredibly tender meat that's seasoned through and through, enveloped in that show-stopping caramel-brown skin that's such a pleasure to eat. And they're all utterly simple and satisfying. In a year full of so many other complications, let your holiday bird be stress-free.
Buttermilk-Brined Roast Turkey
Yield: 10 to 14 servings
Total time: 2 hours, plus 48 hours' brining
1 (10- to 14-pound) turkey
3 quarts buttermilk
128 grams fine sea salt (about 7 tablespoons)
Two to three days before you plan to cook, spatchcock the turkey: Put the turkey on a stable cutting board, breast side down, and use heavy-duty kitchen shears to snip along both sides of the backbone to release it. You can start from the tail or neck end, whichever you prefer; just keep the blades of the scissors as close to the spine as possible. It helps to work incrementally, snipping a little on one side, then a little on the other, rather than completing one side entirely and then doing the second side without the advantage of the opposing pressure.
After removing the backbone, remove wingtips, neck and giblets, setting them all aside for stock and gravy.
Turn turkey over so breast faces up. Splay out its legs, and press hard on breastbone until you hear the cartilage pop and the bird lies completely flat.
Place a 2-gallon resealable bag in a large bowl, stock pot or sink. Pour buttermilk and salt in bag, and stir to dissolve salt. Place turkey in bag, and seal carefully, expelling out air. Double-bag the turkey as needed to prevent leakage, then squish the inner bag to distribute buttermilk all around the turkey. Place it on a rimmed baking sheet, and refrigerate for 48 hours. Turn the bag every 12 hours so that every part of the turkey gets marinated.
Three hours before you plan to start cooking, remove the turkey from the plastic bag, and scrape off as much buttermilk as you can without being obsessive, discarding buttermilk. Set the turkey on a rimmed baking sheet, and bring it to room temperature.
Position a rack in the upper third of the oven, and heat to 400 degrees. Transfer turkey, breast side up, to another rimmed baking sheet lined with a wire rack or parchment paper. Tuck thighs inward.
Place baking sheet on the prepared oven rack, and roast the turkey, occasionally rotating the pan 180 degrees, until an instant-read thermometer inserted into the deepest part of the breast registers 150 degrees and the thickest part of the thigh without touching bone registers 165 degrees, 80 to 100 minutes, depending on size. (You may want to tent the breast or other hot spots with aluminum foil, if darkening too quickly.)
Transfer turkey to a cutting board or platter, and allow to rest at least 20 minutes before carving.
Buttermilk-Brined Turkey Breast
Yield: 4 to 6 servings
Total time: 1 hour, plus 24 to 36 hours' brining
2 cups buttermilk
33 grams fine sea salt (2 tablespoons)
1 half turkey breast (about 2 1/2 pounds), on or off the bone
One to two days before you plan to cook, place buttermilk and salt in a gallon-size resealable plastic bag, and stir to dissolve salt. Place turkey breast in the bag, and seal carefully, expelling the air. Squish the bag to distribute buttermilk all around the turkey, place on a rimmed plate, and refrigerate for 24 to 36 hours. If you're so inclined, you can turn the bag periodically so every part of the turkey gets marinated, but that's not essential.
Two hours before you plan to start cooking, remove the turkey from the plastic bag and scrape off as much buttermilk as you can without being obsessive. Discard buttermilk, set the breast on a rimmed plate and bring it to room temperature.
Position a rack in the upper third of the oven, and heat to 425 degrees. Place breast skin side up on a rimmed baking sheet lined with a wire rack or parchment paper.
Place baking sheet on the prepared oven rack, and roast the turkey until an instant-read thermometer inserted into the deepest part of the breast without touching bone registers 150 degrees, about 40 minutes for a boneless breast or 50 minutes for a bone-in breast. (You may want to tent the breast with aluminum foil if it's darkening too quickly.)
Transfer turkey to a cutting board or platter, and allow to rest at least 15 minutes before carving.
Samin Nosrat is an American chef, TV host and food writer. She is a regular food columnist for The New York Times Magazine and has a Netflix docu-series based on her cookbook, "Salt, Fat, Acid, Heat."
 Samin Nosrat, author of "Salt Fat Acid Heat." / Photo by Aya Brackett/The New York Times